Core Documentation
Below you find documentation of how Loadcoder Core parts works and best practices of how to build Loadcoder tests.
Hello World
Below is a simple example of how a Loadcoder test is built up
import static com.loadcoder.statics.Statics.*;
import com.loadcoder.load.LoadUtility;
import com.loadcoder.load.chart.logic.RuntimeChart;
import com.loadcoder.load.scenario.ExecutionBuilder;
import com.loadcoder.load.scenario.Load;
import com.loadcoder.load.scenario.LoadBuilder;
import com.loadcoder.load.scenario.LoadScenario;
import com.loadcoder.result.Result;

public class HelloWorldLoadTest {

  public static void main(String[] args) {
    new HelloWorldLoadTest().simpleLoadTest();
  }

  LoadScenario loadScenario = new LoadScenario() {

    @Override
    public void loadScenario() {

      load("sleep", () -> {
        LoadUtility.sleep(20);
      }).perform();
    }

  };

  public void simpleLoadTest() {

    Load load = new LoadBuilder(loadScenario).amountOfThreads(10).rampup(10 * SECOND)
        .stopDecision(duration(20 * SECOND)).build();

    RuntimeChart runtimeChart = new RuntimeChart();

    Result result = new ExecutionBuilder(load).storeAndConsumeResultRuntime(runtimeChart).build().execute()
        .andWait().getReportedResultFromResultFile();


    runtimeChart.waitUntilClosed();

  }
}
Transactions
Transactions are a fundamental concept in Loadcoder, and used to build up the scenario to be simulated. The transactions will be used by Loadcoder to establish what response times to be measured, and as base to to define the load level. Each transaction are defined with a name and a code block, conveniently expressed as a lambda expression. The response time for a transaction will be the execution time of the transactions lambda expression code block. See the examples below
This is the most simple example of a transaction. The name of the transaction is nothingToReturn and consists of an empty code block. Response time close or equal to 0 can be expected for this.
load("nothingToReturn", () -> {}).perform();The first transaction below consists of a call to the method getSecurityToken, which returns a String value. This value is used as an input to the next request.
String securityToken = load("getSecurityToken", () -> {
  return getSecurityToken();
}).perform();

load("authenticate", () -> {
  authenticate(securityToken);
}).perform();
Handle result
The result of the transaction can be handeled after the execution, by invoking the handleResult method with a lambda expression that takes the ResultHandler of the parameter. With this you can fetch everything related with the transaction result, such as the response object, thrown exception, response time. This can be used in order to decide whether to the status of the transaction shall be set to true or false. Default status value is true. If the transaction are throwing an exception, the status is default false.
load("handleResult", () -> {
  return new SomeKindOfObject();
})
.handleResult(resultHandler->{
  SomeKindOfObject returnedObject = resultHandler.getResponse();
  if(returnedObject == null) {
    resultHandler.setStatus(false);
  }

  if(resultHandler.getResponseTime() > 500) {
    resultHandler.setStatus(false);
	log.error(resultHandler.getTransactionName() + " very slow");
  }
  resultHandler.setMessage("message that will be included in the result log");
}).perform();
Below is an example of handleResult where the transaction are throwing an Exception, and then used to decide if the status should be set to true
load("throwException", () -> {
  throw new IOException("Transaction threw exception");
}).handleResult(resultHandler->{

  Exception theThrownException = resultHandler.getException();
  if(theThrownException instanceof RuntimeException) {
    resultHandler.setStatus(true);
  }
}).perform();
If you need the transaction result outside the transaction in your scenario logic, you can return the whole ResultHandler object using the performAndGetModel
ResultModel<SomeKindOfObject> resultModel = load("nothingToReturn", () -> {
  return new SomeKindOfObject();
}).performAndGetModel();
Transaction Peaks
Sometimes it's important to do loadtests where many transactions (or spcifically the calls to you system you are testing) are happening at the same time, making the load for that particular transaction to peak. This can be done at the transaction level by using the method peak. Below transaction will have a 5% possibility to stall. When this happens, every thread that also reaches this transaction will stall until there are a total of 9 stalled threads. The stalled threads will then be released at once, which will result in that the transactions will execute in the same time.
load("possibilityOfPeak", () -> {
  LoadUtility.randomSleep(20, 200);
}).peak(9, 0.05).perform();
Asynchronous Transaction
It is possible to execute the transaction asynchronously. This will delegate the transaction execution to another thread and the current thread will immediately return and continue to execute the remainder of the scenario. This is useful if you want to simulate different transactions in parallel, or as a way to not let a long response time be a limitation for the throughput. The transaction is done asynchronously using the performAsync method.
load("asynchronous", () -> {
  LoadUtility.sleep(30);
}).performAsync();
Breaking Iterations
If a transactions fails, you may don't want the iteration continue. You can break the iteration by letting the transaction execution throw an exception upon a failed status, using the method throwIfFailed. Note that this is really nothing else than a RuntimeException being thrown, so if the transaction is made inside a try catch block, this exception may be caught, resulting in unintended behaviour.
You can of course break the iteration in other ways as well, by letting an exception be thrown from the scenario, ur simply by performing a return statement.
load("breakIteration", () -> {}).handleResult(resultHandler->{
  resultHandler.setStatus(false);
}).throwIfFailed().perform();

//another way of breaking the iteration
throw new RuntimeException("Breaking iteration");

//or by a return statement
return;
Load definition
The load is defined by setting up the Load object through the LoadBuilder that takes a LoadScenario as argument
Below Load is created using the default values. Only one thread will execute the scenario iteration one time, and after that finish.
Load oneIterationOneThread = new LoadBuilder(getScenario()).build();Use the stopDecision method to define when and how to stop the loadtest. This method takes a StopDecison instance which can be expressed as a lambda expression. Loadcoder comes with two built in implementation that covers the common needs, which is to stop after a certain execution time, and to stop after an amount of done iterations, see below example. You can of course implement you own StopDecsion as you like it.
Load durationBased = new LoadBuilder(getScenario())
  .stopDecision(duration(10 * SECOND))
  .build();

Load iterationBased = new LoadBuilder(getScenario())
  .stopDecision(iterations(20))
  .build();
The amount of thread to use the scale up the load is simply set with the amountOfThreads method, like below. All threads will start at the same time to execute the scenario
Load iterationBased = new LoadBuilder(getScenario())
.amountOfThreads(10)
  .stopDecision(duration(10 * SECOND))
  .build();
You can also choose to gradually increase to amount of running threads over time, by setting the total rampup time with the method rampup, like below. First thread will start at time 0. 10th thread will start 5 seconds later.
Load iterationBased = new LoadBuilder(getScenario())
  .amountOfThreads(10)
  .rampup(5 * SECOND)
  .stopDecision(duration(10 * SECOND))
  .build();
You can use a throttle to limit the load intensity by using the throttle method, which takes 3 parameter. Below throttle will limit the load so that only 15 transactions per second will be done for this load definition. You can also define the throttle using PER_THREAD instead of SHARED. Then the throttling will be done individually for each thread.
Load iterationBased = new LoadBuilder(getScenario())
  .amountOfThreads(10)
  .stopDecision(duration(10 * SECOND))
  .throttle(15, PER_SECOND, SHARED)
  .build();
A throttle can also be set at the iteration level. This throttle will only limit the load intensity between iterations and not between transactions. Can be used alone or in addition to the transaction trottle.
Load iterationBased = new LoadBuilder(getScenario())
  .amountOfThreads(10)
  .stopDecision(duration(10 * SECOND))
  .throttleIterations(120, PER_MINUTE, PER_THREAD)
  .build();
Execution
The loadtest execution is done by building a Execution instance through the ExecutionBuilder, that takes one or more Load definitions as parameters
Below Execution is created and then started. The andWait method will wait until the load execution is finished.
FinishedExecution finished = new ExecutionBuilder(load)
.build().execute().andWait();
the FinishedExecution can then be used to get the loadtest result from the result log file
Result result = finished.getReportedResultFromResultFile();Summary
The Result can be summarized in a configurable way. The summary can both be printed as well as used to verify the outcome of the test.
result.summaryStandard().build().prettyPrint(); ---Load test summary---
Total transactions: 10
Duration: 5sec
Throughput: 2.0 tps
Fails: 3
Transactions Amount Fails Avg Max Min 95%
trans_1 10 3 5.2 43 1 43
TOTAL 10 3 5.2 43 1 43 Let's say that you are missing the median value in the summary transaction table. You can easily add this by invoking the use method that takes a TransactionValueCalculator argument. The context object exposes some of the most common fields you would in a summary transaction table, like the median:
Summary summary = result.summaryStandard()
  .perTransaction((builder, context)-> builder.use(context.median()))
  .build();
summary.prettyPrint();
...
Transactions Amount Fails Avg Max Min 95% Median
trans_1 10 3 4.2 37 0 37 6
TOTAL 10 3 4.2 37 0 37 6 You can also define your own field completely how you like it. The lambda expression is provided with the transactionList, which is the complete transaction list for a particual transaction type:
Summary summary = result.summaryStandard()
  .perTransaction((builder, context)-> builder
    .use(context.median())
    .use((transactionList, valueHolder) ->
      valueHolder.build("First Value", transactionList.get(0).getValue()))
  )
...
Transactions Amount Fails Avg Max Min 95% Median First Value
trans_1 10 3 4.8 41 0 41 6 41
TOTAL 10 3 4.8 41 0 41 6 41 You can also define your own field completely how you like it:
Summary summary = result.summaryStandard()
  .perTransaction((builder, context)-> builder
    .use(context.median())
    .use((transactionList, valueHolder) ->
      valueHolder.build("First Value", transactionList.get(0).getValue()))
  )
...
Transactions Amount Fails Avg Max Min 95% Median First Value
trans_1 10 3 4.8 41 0 41 6 41
TOTAL 10 3 4.8 41 0 41 6 41 It's also possible to state new overall fields. The OverallValueCalculator that is sent into the use method will in this case be provided with the entire Result that you can build your values from
result.summaryStandard()
  .overall((builder, context)-> builder.use((r, valueHolder)->{
    return valueHolder.build("Number of transaction types", r.getResultLists().size());
  })).build().prettyPrint();
...
Fails: 3
Number of transaction types: 1
Transactions Amount Fails Avg Max Min 95%
trans_1 10 3 5.3 44 1 44
TOTAL 10 3 5.3 44 1 44 You can configure how the value are rounded and how they are printed. Loadcoder will use maximum 2 decimals as default. By using the roundValues you can set this to another value. You would also need to change the way the values are printed in the summary, by provoding a PrinterFormatBuilable into the prettyPrint method, like below example
result.summaryStandard()
  .overall((builder, context)-> builder.use((r, valueHolder)->{
    return valueHolder.build("OverallDecimal", 1.23456);
  }))
  .perTransaction((builder, context)-> builder
    .use((transactionList, valueHolder) ->
      valueHolder.build("TransactionDecimal", 2.34567)))
  .roundValues(4)
  .build().prettyPrint((a,b)->{a.convert("OverallDecimal", c->c.asDecimalString(4))
    .convert("TransactionDecimal", c->c.asDecimalString(4));});
---Load test summary---
Total transactions: 10
Duration: 5sec
Throughput: 2.0 tps
Fails: 3
OverallDecimal: 1.2346
Transactions Amount Fails Avg Max Min 95% TransactionDecimal
trans_1 10 3 6.3 56 0 56 2.3457
TOTAL 10 3 6.3 56 0 56 2.3457 You can retrieve the values for each of the fields in the summary, and use it to assert whether the test is successful or not. The example below shows a summary with two transaction types where the the assertMethods (from JUnit) verifies that the result are as expected
Summary summary = result.summaryStandard().build();
summary.prettyPrint();
assertTrue(summary.overall("Throughput") > 3);
assertTrue(summary.transaction("Avg", "trans_1") < 10);
assertEquals(summary.allTransactions("Amount").intValue(), 20);
---Load test summary---
Total transactions: 20
Duration: 5sec
Throughput: 4.0 tps
Fails: 3
Transactions Amount Fails Avg Max Min 95%
trans_2 10 3 40.2 41 40 41
trans_1 10 0 7.4 49 0 49
TOTAL 20 3 23.8 49 0 49 Graphing
Your Loadcoder test can be configured to show the loadtest result using Grafana & InfluxDB which is the recommended way to store and make the result presentable. Read the Grafana & InfluxDB chapter at the Loadcoder Cluster instruction page forh further information.
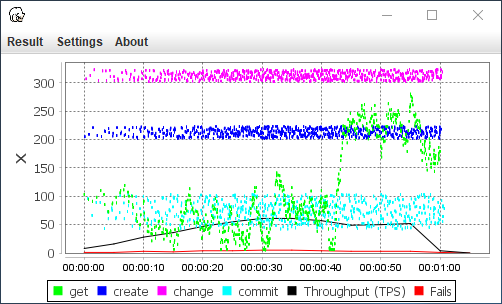
Loadcoder has also a built in GUI that can show the result of a loadtest, both during and after an execution. This is a really easy way for you to show your results locally.
If you want to start your execution with runtime GUI, create a RuntimeChart and add it to the Execution like below
RuntimeChart chart = new RuntimeChart();
Result result = new ExecutionBuilder(load)
  .storeAndConsumeResultRuntime(chart)
  .build().execute().andWait().getReportedResultFromResultFile();
If you want to show the result as a graph after the test, you can do this as well
Result result = new ExecutionBuilder(shortLoad)
  .build().execute().andWait().getReportedResultFromResultFile();

ResultChart resultChart = new ResultChart(result);
resultChart.waitUntilClosed();
Note that the RuntimeChart is optimized for performance and will only give you an aggregated picture of the result. The RuntimeChart however is made for showing the data in the most detailed and accurate way, with more functionality to filter the data and configure the graph like you want it.
If you saved the results to a log file, you can always reload this file and present it in the ResultChart or as a summary report.
Result result = new ExecutionBuilder(shortLoad)
  .build().execute().andWait().getReportedResultFromResultFile();

ResultChart resultChart = new ResultChart(result);
resultChart.waitUntilClosed();
Logging
The logging in Loadcoder is done throught slf4j interface, meaning that you can choose both logback or log4j as your logging library. If you use the loadcoder-all module however, you will get logback as a transitive dependency. The Following section describes how to setup logging with logback
logback.xml
logback.xml is the default file for the logging configuration of logback. Place it directly in the resource root (src/main/resources/logback.xml) so logback will find it. See below example.
There are two particular things to notice about this file:
- The appenders are created with the customized FileAppender SharedDirFileAppenderLogback. This type of appenden will enable you to change logging directory runtime. The purpose of this is both to have a way of running multiple test reporting to different result files in one execution. It is also useful since you can use this to store your logfiles at a place where they won't be overwritten if running the same test again.
- There is a logger for the class com.loadcoder.result.Logs. This is the class that logs out the transaction results. Note that you result logging might be broken if this logger is tampered.
<?xml version="1.0" encoding="UTF-8"?>
<configuration>
	<!-- test test -->
	<appender name="resultappender" class="com.loadcoder.logback.SharedDirFileAppenderLogback">
		<file>result.log</file>
		<append>false</append>
		<encoder>
			<pattern>%m%n</pattern>
		</encoder>
	</appender>

	<appender name="INFOFILE" class="com.loadcoder.logback.SharedDirFileAppenderLogback">
		<file>info.log</file>
		<append>false</append>
		<encoder>
			<pattern>%date{HH:mm:ss.SSS} [%thread] %logger{0} - %m%n</pattern>
		</encoder>
	</appender>

	<appender name="CONSOLEAPPENDER" class="ch.qos.logback.core.ConsoleAppender">
		<layout class="ch.qos.logback.classic.PatternLayout">
			<Pattern>
				%date{HH:mm:ss.SSS} [%thread] %logger{0} - %m%n
			</Pattern>
		</layout>
	</appender>

	<logger name="com.loadcoder.result.Logs" level="debug"
		additivity="false">
		<appender-ref ref="resultappender" />
	</logger>

	<root level="info">
		<appender-ref ref="INFOFILE" />
		<appender-ref ref="CONSOLEAPPENDER" />
	</root>

</configuration>
Set/Change logging directory
You can set the logging directory so that the loadtest results are being logged in the new location. This is possible to perform multiple times during runtime. This will be useful if you run multiple test at the same execution, and you want the results the be logged in separate log file. This is done by calling method setResultDestination before the loadtest begins.
setResultDestination(new File("target/myLoadTest"));The problem with the call below is that the directory will be reused if running this code twise. To get around this you can use the helper method getNewLogDir, which will create a directory with a unique name each time it is invoked. It takes one parameter with the base path where the log directories shall be created, and another parameter for the name of the test. The unique directory will then be created inside basepath/testname with a date time based name. So the result.log path will be similar to target/myLoadTest/20200607-171953/result.log
setResultDestination(getNewLogDir("target", "myLoadTest"));